Creating a Basic Driving Robot#
Lets get moving!
Overview#
This section is designed to help you program a basic driving robot, start to finish.
See table of contents for a breakdown of this section.
Quick Select: Motor Controller#
Switch all code examples on this page between SparkMax and TalonFX:
Creating the Drivetrain Subsystem#
Before we begin we must create the class file for the drivetrain subsystem. See Creating a New Subsystem for info on how to do this.
What will be added to the Drivetrain#
In the Drivetrain class we will tell the subsystem what type of components it will be using.
- A Drivetrain needs motor controllers. In our case we will use Neo SparkMaxes (a brand of controller for motors made by Rev Robotics).
- You could use other motor controllers such as Victor SPs or Talon SRs but we will be using NEO SparkMaxes
- If you are using other motor controllers, replace SparkMax with Talon, TalonSRX, Victor, or VictorSP in the code you write depending on the type you use.
- You can use 2 motors (left and right), but for this tutorial we will use 4.
More Info
Be sure to read Visual Studio Code Tips before getting started! It will make your life a lot easier.
Declaring Motor Variables#
1) Create 4 global variables of the appropriate motor controller type and name them: leftLeader, rightLeader, leftFollower, rightFollower
Type the word SparkMax followed by the name, e.g.: private final SparkMax leftLeader;
These will eventually hold the object values for SparkMaxes, their port numbers, and their motor type (brushed or brushless).
Type the word TalonFX followed by the name, e.g.: private final TalonFX leftLeader;
These will eventually hold the object values for TalonFX motors. Unlike SparkMax, TalonFX does not require a motor type parameter.
Java concept: private final fields
private means only this class can access this variable — no other subsystem or command can accidentally change your motor objects. final means the variable is assigned once (in the constructor) and never reassigned. Together they say "this motor belongs exclusively to this subsystem." See Variables and Data Types for more on final and Classes for more on private.
2) These are declared without values right now.
- We do this to make sure it is empty at this point.
- When we assign these variables a value, we will be getting the motor controller's port numbers out of Constants
- This means we cannot assign them at the global level
Example code
Motor Member Variables:
If an error occurs (red squiggles)
-
Mouse Over the word : The following menu should appear.

-
💡 Click "quick fix"

-
Select "Import 'SparkMax' (com.revrobotics.spark)" or "Import 'TalonFX' (com.ctre.phoenix6) depending on which motor controller you are using.

-
Your error should be gone!
Creating and filling the constructor#
Now that we have created the motor variables and the Drive Constants we must initialize them and tell them what port on the roboRIO they are on.
1) Initialize (set value of) the motor variables with the appropriate motor controller constructor.
Initialize leftLeader to new SparkMax(LEFT_LEADER_ID, MotorType.kBrushless).
- This initializes a new SparkMax,
leftLeader, in a new piece of memory and states it is on the port defined byLEFT_LEADER_ID. - The constructor
SparkMax(int, MotorType)takes a variable of typeintfor the CAN ID andMotorTypefor brushless or brushed.
Initialize leftLeader to new TalonFX(LEFT_LEADER_ID).
- This initializes a new TalonFX,
leftLeader, in a new piece of memory and states it is on the port defined byLEFT_LEADER_ID. - Unlike SparkMax, TalonFX takes only the CAN ID — no motor type parameter is needed (TalonFX is always brushless).
- This should be done within the constructor
CANDriveSubsystem()
Java concept: Constructor
The constructor is a special method that runs once when an object is created with new. It is where hardware gets initialized — motors receive their port numbers, controllers get configured. The constructor name always matches the class name exactly. See Java Classes for more information.
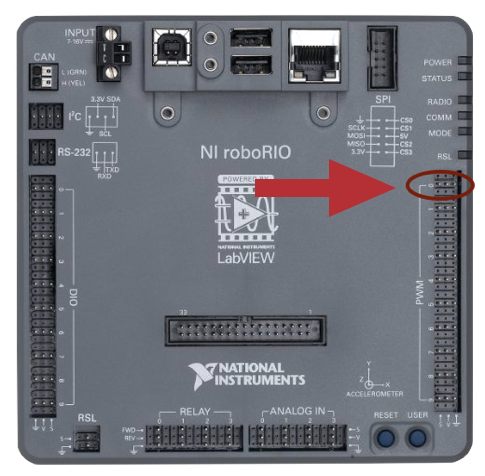
roboRIO port diagram
Constructor Initialization Example
Full Constructor:
  public CANDriveSubsystem() {
    // create brushed motors for drive
    leftLeader = new SparkMax(LEFT_LEADER_ID, MotorType.kBrushed);
    leftFollower = new SparkMax(LEFT_FOLLOWER_ID, MotorType.kBrushed);
    rightLeader = new SparkMax(RIGHT_LEADER_ID, MotorType.kBrushed);
    rightFollower = new SparkMax(RIGHT_FOLLOWER_ID, MotorType.kBrushed);

    // set up differential drive class
    drive = new DifferentialDrive(leftLeader, rightLeader);

    // Set can timeout. Because this project only sets parameters once on
    // construction, the timeout can be long without blocking robot operation. Code
    // which sets or gets parameters during operation may need a shorter timeout.
    leftLeader.setCANTimeout(250);
    rightLeader.setCANTimeout(250);
    leftFollower.setCANTimeout(250);
    rightFollower.setCANTimeout(250);

    // Create the configuration to apply to motors. Voltage compensation
    // helps the robot perform more similarly on different
    // battery voltages (at the cost of a little bit of top speed on a fully charged
    // battery). The current limit helps prevent tripping
    // breakers.
    SparkMaxConfig config = new SparkMaxConfig();
    config.voltageCompensation(12);
    config.smartCurrentLimit(DRIVE_MOTOR_CURRENT_LIMIT);

    // Set configuration to follow each leader and then apply it to corresponding
    // follower. Resetting in case a new controller is swapped
    // in and persisting in case of a controller reset due to breaker trip
    config.follow(leftLeader);
    leftFollower.configure(config, ResetMode.kResetSafeParameters, PersistMode.kPersistParameters);
    config.follow(rightLeader);
    rightFollower.configure(config, ResetMode.kResetSafeParameters, PersistMode.kPersistParameters);

    // Remove following, then apply config to right leader
    config.disableFollowerMode();
    rightLeader.configure(config, ResetMode.kResetSafeParameters, PersistMode.kPersistParameters);
    // Set config to inverted and then apply to left leader. Set Left side inverted
    // so that postive values drive both sides forward
    config.inverted(true);
    leftLeader.configure(config, ResetMode.kResetSafeParameters, PersistMode.kPersistParameters);
  }
See CANDriveSubsystem.java for the complete constructor implementation.
  public CANDriveSubsystem() {
    // Create TalonFX motors for drive
    leftLeader = new TalonFX(LEFT_LEADER_ID);
    leftFollower = new TalonFX(LEFT_FOLLOWER_ID);
    rightLeader = new TalonFX(RIGHT_LEADER_ID);
    rightFollower = new TalonFX(RIGHT_FOLLOWER_ID);

    // Set up differential drive class
    drive = new DifferentialDrive(leftLeader, rightLeader);

    // TalonFX communicates over CAN via Phoenix 6 — no explicit CAN timeout is needed.
    // Configuration is applied via getConfigurator().apply() below.

    // Create the configuration. Phoenix 6 does not include a voltageCompensation()
    // equivalent. The current limit helps prevent tripping breakers.
    TalonFXConfiguration config = new TalonFXConfiguration();
    config.CurrentLimits.SupplyCurrentLimit = DRIVE_MOTOR_CURRENT_LIMIT;
    config.CurrentLimits.SupplyCurrentLimitEnable = true;

    // Set followers to follow their respective leaders using Follower control mode.
    // The Follower mode persists once set.
    leftFollower.setControl(new Follower(LEFT_LEADER_ID, false));
    rightFollower.setControl(new Follower(RIGHT_LEADER_ID, false));

    // Remove following, then apply config to right leader with neutral mode set to Brake
    config.MotorOutput.NeutralMode = NeutralModeValue.Brake;
    rightLeader.getConfigurator().apply(config);

    // Set config to inverted and then apply to left leader. Set Left side inverted
    // so that positive values drive both sides forward
    config.MotorOutput.Inverted = InvertedValue.Clockwise_Positive;
    leftLeader.getConfigurator().apply(config);
  }
See CANDriveSubsystem.java for the complete constructor implementation.
Using Constants#
Note
Constants.java fills the same role that older WPILib projects called RobotMap.java — a single file mapping every physical port to a named constant. If you see references to RobotMap in older FRC code examples, treat them the same as Constants.
Since each subsystem has its own components with their own ports, it is easy to lose track of which ports are being used and for what. To counter this you can use a class called Constants to hold all these values in a single location.
- Names should follow the pattern SUBSYSTEM_NAME_OF_COMPONENT
- The name is all caps since it is a constant (more info on constants).
Before we initalize the SparkMax objects we are going to create constants to hold the CAN ID's of the motors. This will happen in constants.java
- Inside the constants class, create a new class called
public static DriveConstants. - Inside
DriveConstantsclass, create for constants calledLEFT_LEADER_ID,LEFT_FOLLOWER_ID,RIGHT_LEADER_ID, andRIGHT_FOLLOWER_ID. - Back in your
DriveTrainclass indrivetrain.java, import theDriveConstantsclass as follows:Import frc.robot.Constants.DriveConstants;.
Tip
Make sure to declare constants with public static final so they cannot be changed at runtime.
Danger
If you set this to the wrong value, you could damage your robot when it tries to move!
Note
To use Constants, instead of putting 0 for the port in the SparkMax type:
Note
Replace the remaining numbers with constants.
Tip
Remember to save both Drivetrain.java and Constants.java
DriveConstants Example
Drive Constants Definition:
  public static final class DriveConstants {
    // Motor controller IDs for drivetrain motors
    public static final int LEFT_LEADER_ID = 1;
    public static final int LEFT_FOLLOWER_ID = 2;
    public static final int RIGHT_LEADER_ID = 3;
    public static final int RIGHT_FOLLOWER_ID = 4;

    // Current limit for drivetrain motors. 60A is a reasonable maximum to reduce
    // likelihood of tripping breakers or damaging CIM motors
    public static final int DRIVE_MOTOR_CURRENT_LIMIT = 60;
  }
Full Constants.java with all Robot Constants:
See Constants.java for the complete constants file including OperatorConstants and other subsystem constants.
See Constants.java for the complete constants file including OperatorConstants.
Warning
Remember to use the values for YOUR specific robot or you could risk damaging it!
Configuring Motor Controllers#
Setting CAN Communication Timeout:
Each SparkMax motor must be configured with a CANTimeout (how long to wait for a response from the motor controller).
No CAN timeout needed
Phoenix 6 manages CAN communication internally. No explicit setCANTimeout() equivalent exists. Configuration is applied via getConfigurator().apply(config) — see the section below.
Voltage Compensation and Current Limiting:
Create the configuration to apply to motors. The current limit helps prevent tripping breakers.
Voltage compensation helps the robot perform more similarly on different battery voltages (at the cost of a little bit of top speed on a fully charged battery).
Phoenix 6 does not include a direct voltage compensation equivalent. Supply current limiting still protects your breakers.
See CANDriveSubsystem.java for the full configuration implementation in the constructor.
See CANDriveSubsystem.java for the full configuration implementation in the constructor.
Creating the arcade drive#
What is the Drive Class#
- The FIRST Drive class has many pre-configured methods available to us including DifferentialDrive, and many alterations of MecanumDrive.
- DifferentialDrive contains subsections such as TankDrive and ArcadeDrive. For more information and details on drive bases see the WPILib documentation.
- For our tutorial we will be creating an ArcadeDrive
- Arcade drives run by taking a moveSpeed and rotateSpeed. moveSpeed defines the forward and reverse speed and rotateSpeed defines the turning left and right speed.
- To create an arcade drive we will be using our already existing Drivetrain class and adding to it.
Programing a RobotDrive#
1) Create the DifferentialDrive object.
Member Variable Declaration:
This defines the drive object that we will use to drive the robot.
Constructor Initialization:
drive = new DifferentialDrive(leftLeader, rightLeader);
- Since DifferentialDrive takes 2 parameters we pass the left and right leader motors.
- Both SparkMax and TalonFX implement the WPILib
MotorControllerinterface, so they work directly withDifferentialDrive. - The follower motors are configured separately (see below) to follow the leaders.
Warning
You should only group motors that are spinning the same direction physically when positive power is being applied otherwise you could damage your robot.
2) In order to configure the motors to drive correctly, we need to configure one on each side as the leader and one as the follower. In the constructor we are going to set the follower motors and link them to the leader motors.
To do this we will need to include classes from the REV Library:
import com.revrobotics.spark.SparkBase.PersistMode;
import com.revrobotics.spark.SparkBase.ResetMode;
Then in the constructor, configure the followers to follow the leaders:
Set follower configuration:
    config.follow(leftLeader);
    leftFollower.configure(config, ResetMode.kResetSafeParameters, PersistMode.kPersistParameters);
    config.follow(rightLeader);
    rightFollower.configure(config, ResetMode.kResetSafeParameters, PersistMode.kPersistParameters);
Configure right leader:
    config.disableFollowerMode();
    rightLeader.configure(config, ResetMode.kResetSafeParameters, PersistMode.kPersistParameters);
Invert left leader for correct motor direction:
To do this we will need to include classes from the Phoenix 6 Library:
import com.ctre.phoenix6.controls.Follower;
import com.ctre.phoenix6.signals.InvertedValue;
import com.ctre.phoenix6.signals.NeutralModeValue;
import com.ctre.phoenix6.configs.TalonFXConfiguration;
Then in the constructor, configure the followers to follow the leaders:
Set follower configuration:
    leftFollower.setControl(new Follower(LEFT_LEADER_ID, false));
    rightFollower.setControl(new Follower(RIGHT_LEADER_ID, false));
Note: Phoenix 6 followers are set with a persistent control mode. Once set in the constructor, the follower mirrors its leader automatically.
Configure right leader:
    config.MotorOutput.NeutralMode = NeutralModeValue.Brake;
    rightLeader.getConfigurator().apply(config);
Invert left leader for correct motor direction:
Full Drive Subsystem Example
See CANDriveSubsystem.java for the complete implementation with all motor configuration and initialization.
See CANDriveSubsystem.java for the complete implementation with all motor configuration and initialization.
Creating the driveArcade Command Factory#
Instead of writing a separate command class, we use the command factory pattern — a method on the subsystem that returns a Command. This is the modern WPILib approach and keeps drive logic inside CANDriveSubsystem where it belongs. See Command Based Robot for background on commands.
Abstract
Below the periodic method, add the driveArcade factory method:
=== “SparkMax”
java title=”CANDriveSubsystem.java”
    --8<-- “docs/code_examples/2026KitBotInline/subsystems/CANDriveSubsystem.java:drive-arcade-method”
=== “TalonFX”
java title=”CANDriveSubsystem.java”
    --8<-- “docs/code_examples/2026KitBotInlineTalonFX/subsystems/CANDriveSubsystem.java:drive-arcade-method”
this.run(...)creates a command that calls the lambda repeatedly while scheduled. The subsystem is automatically added as a requirement.- The parameters are
DoubleSupplier(a function that returns adouble) rather than plaindoublevalues. This ensures the joystick reading is evaluated every loop cycle instead of being captured once. This is important to ensure the robot continuously responds to joystick movement. drive.arcadeDrive(...)is the WPILibDifferentialDrivecall that physically moves the motors.
Note
To use tank drive instead, replace drive.arcadeDrive(...) with drive.tankDrive(...) and rename the method accordingly.
Tip
Multiply the speed values by a decimal to cap the max speed during initial testing (e.g. xSpeed.getAsDouble() * 0.5). This makes it easier to verify the robot drives in the correct directions before running at full power/speed.
Wiring Up in RobotContainer#
Now we connect the subsystem to the driver’s controller by setting a default command in RobotContainer.java.
Adding the Driver Controller#
The RobotContainer class holds all subsystems, controllers, and command bindings. A CommandXboxController is declared here and reads joystick input.
Note
1) Open Constants.java and confirm the DRIVER_CONTROLLER_PORT constant is present inside OperatorConstants.
2) Open RobotContainer.java and confirm a CommandXboxController driverController field is declared at the top of the class that uses that constant.
!!! tip “Finding your joystick port in the Driver Station”
Open the Driver Station application and click the USB tab (the plug icon on the left). The number next to your controller is its port — use that value for DRIVER_CONTROLLER_PORT in Constants. Controllers can be dragged in the list to change their assigned port (the controller port is usually 0 by default if only one controller is plugged in).
Using setDefaultCommand#
setDefaultCommand tells a subsystem which command to run whenever no other command is using it. Since we always want the driver to be able to move the robot, the drive factory command is set as the default.
Abstract
Inside configureBindings() in RobotContainer.java, add:
=== “SparkMax”
java title=”RobotContainer.java”
    --8<-- “docs/code_examples/2026KitBotInline/RobotContainer.java:drive-config”
=== “TalonFX”
java title=”RobotContainer.java”
    --8<-- “docs/code_examples/2026KitBotInlineTalonFX/RobotContainer.java:drive-config”
- The Y axis is negated so pushing the stick away from you (a negative joystick value) drives the robot forward (positive motor output).
- The X axis is negated to match WPILib’s counter-clockwise-positive rotation convention.
- Both axes are scaled by constants defined in
OperatorConstantsto make the robot easier to control at full stick deflection.
Tip
The ()-> syntax creates a lambda — an anonymous function. More about Lambdas
Lambdas are required here because driveArcade expects DoubleSupplier parameters. A lambda () -> driverController.getLeftY() is a DoubleSupplier — it gets called every loop cycle so the robot continuously responds to joystick movement.
??? example “Full RobotContainer Example”
=== “SparkMax”
See RobotContainer.java for the complete RobotContainer implementation.
=== “TalonFX”
    See [RobotContainer.java](../code_examples/2026KitBotInlineTalonFX/RobotContainer.java) for the complete `RobotContainer` implementation.